Exclusive Page Setup Guide: Rule-Matched, Direct to a Dedicated Landing Page

The Exclusive Page is the layer DeepClick adds on top of the Fallback Page — using rules to identify returning users and show them a different page from new users. The configuration process splits in two: first create an Exclusive Page, then mount it on a ReflowLink and set the rule in the link editor. 9 steps end to end.
⚡ TL;DR: 5 steps to create an Exclusive Page + 4 steps to set the rule in the ReflowLink. Once the rule is in place, qualifying returning users skip the Fallback Page on reflow and go straight to this dedicated page.
Not yet familiar with what an Exclusive Page does? See Exclusive Page: Send Returning Users Straight to a Dedicated Landing Page.
Part 1: Create an Exclusive Page
Step 1: Open the Exclusive Page Module
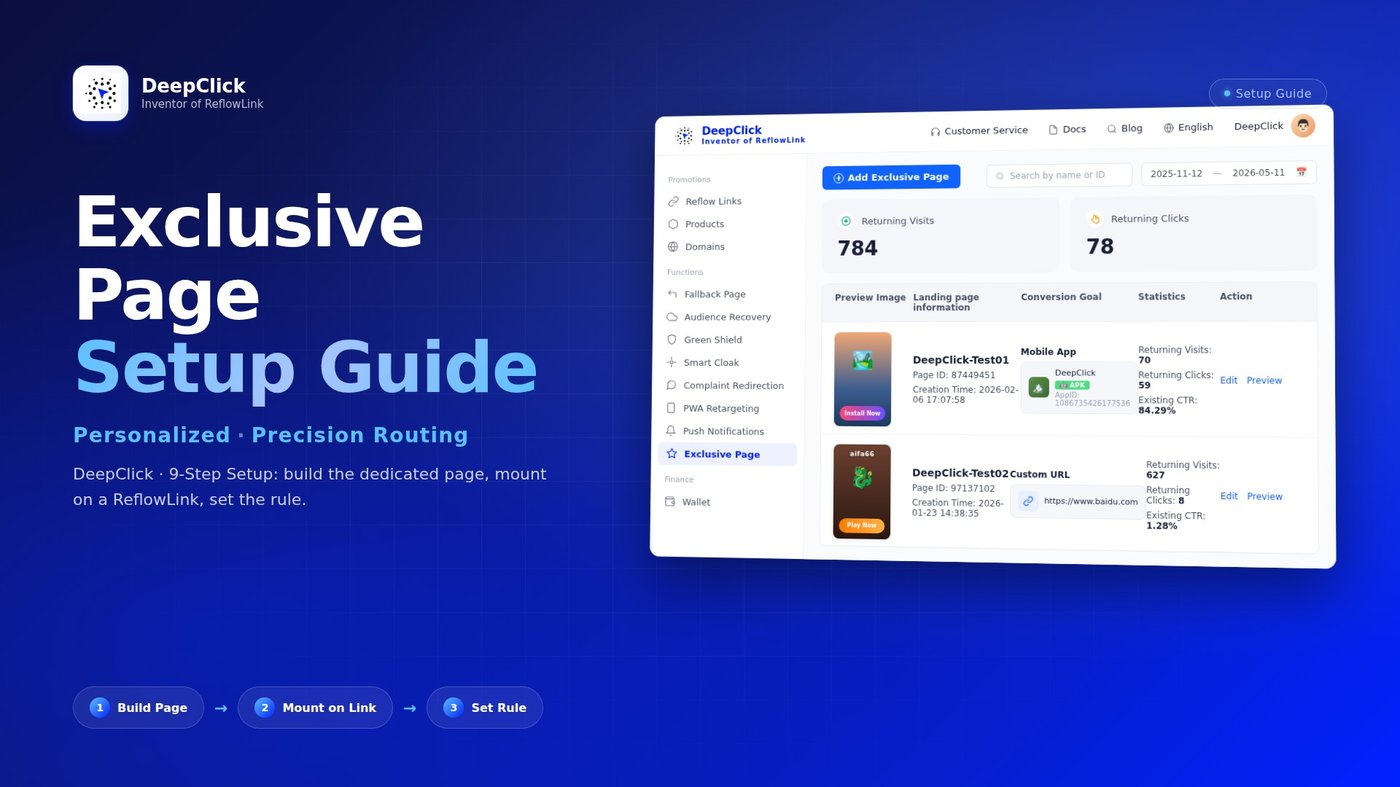
Log in to DeepClick Platform. In the left sidebar under "Functions" group, click "Exclusive Page."

You'll land on the Exclusive Page list view — every Exclusive Page created under this account lives here.
Step 2: Browse the List, Understand the Key Fields
The list page header shows two stat cards:
- Returning Visits: total reflow visits accumulated across all this account's Exclusive Pages
- Returning Clicks: total reflow clicks accumulated
The table below has 5 columns:
|
Column |
Content |
|---|---|
|
Preview Image |
Thumbnail of the landing page background |
|
Landing page information |
Page name + Page ID + creation timestamp |
|
Conversion Goal |
The redirect type for this Exclusive Page: "Mobile App" (from Products) or "Custom URL" |
|
Statistics |
Per-page Returning Visits / Returning Clicks / Existing CTR |
|
Action |
Edit / Preview |

Step 3: New Exclusive Page → Set Creative Content
Click "+ Add Exclusive Page" in the top-left of the list page. The "Exclusive Page Settings" editor opens. Two columns: live preview on the left, creative content form on the right.
The right form has three blocks:
① Landing Page Name (required)
Internal label only — never shown to end users. Use "audience + purpose" naming, e.g., "Returning – Repurchase Offer" or "Tier 1 – Big Prize Wheel."
② Landing Page Background (required)
Supports jpg / jpeg / png / gif / apng / webp. The hint reads: "Please do not upload images with a resolution width of less than 375" — for mobile clarity, aim for a width of at least 750.
③ Install Floating Button (optional toggle)
Off by default. Toggle on to expand three configurations:
- Button Text: button copy, e.g., "Download Now" / "Claim Reward" / "View Now"
- Button Fill: pick "Solid Color" or "Gradient"
- Solid Color: hex value + opacity
- Gradient: "Linear Gradient" + start/end colors + angle
- Button Redirect Address: where the click goes — see Step 4

Step 4: Choose the Button Redirect Address
Two options:
|
Type |
Best for |
|---|---|
|
Custom URL |
Navigate to any external URL (campaign page, product details, deeplink) — most flexible |
|
Products |
Pick a product from the Product Library — navigates to its standard conversion path (App install / Web page) |
When you pick "Custom URL," the "Target Page URL" textbox appears — paste the full URL (with https://).
When you pick "Products," the "Select Product" dropdown shows the products you have in your Product Library; pick one.

Step 5: Publish
Once everything's filled in, click "Publish" in the bottom-right of the editor (the "Exit" button on the left discards changes).
After publishing, you're back on the Exclusive Page list and your newly created page is at the top. At this point the page is just created — not live yet. To take effect, you need to mount it on a ReflowLink and configure the rule.
Part 2: Mount the Page + Configure the Rule on a ReflowLink
The Exclusive Page's rule-driven trigger is configured inside the ReflowLink editor — and that's the key difference from the Fallback Page: a Fallback Page goes live as soon as it's mounted, but an Exclusive Page requires "mount + rule match" to activate.
Step 6: Open the ReflowLink Editor
Go to "Promotions → Reflow Links." Find the link you want to attach the Exclusive Page to and click "Edit."
If you don't have any ReflowLinks yet, click "Create a new reflow link" and walk through the new-link wizard first.
Step 7: Switch to the "Exclusive Page Settings" Tab
In the editor, the left sidebar has 5 tabs:
- Campaign Setup
- Exclusive Page Settings ← you're going here
- Fallback Page Setup
- Claim Resolution Setting
- Basic Information
Click "Exclusive Page Settings" to switch.
💡 Don't see the "Exclusive Page Settings" tab?This tab only appears once the link has filled in "Campaign Setup" (Product Type / Product / Media / Domain / Region). For a brand-new link, fill out the first tab "Campaign Setup" first — "Exclusive Page Settings" will then appear as the second tab.

Step 8: Toggle On, See Returning Visitor Traffic Tiers
The Exclusive Page Settings section has a master toggle at the top, with the subhead: "Set a dedicated page for returning users to boost conversions." The rule configuration area only expands once this toggle is on.

Step 9: Fill in the Rule — Event + Times + Page
Once the toggle is on, the rule area expands as a single sentence:
When users [event] exceed [times], directly enters [page]
Fill in the three blanks:
① Event (dropdown, pick 1 of 3)
|
Event |
Counts as 1 when |
|---|---|
|
Visits |
The user opens the ReflowLink |
|
Reflow Display |
The user actually saw the Fallback Page |
|
Reflow Click |
The user actually clicked on the Fallback Page |
② Times (dropdown, 1-10)
The higher the threshold, the stricter the condition — higher quality returning users, less traffic.
③ Page (dropdown, pick from existing Exclusive Pages)
The dropdown lists every Exclusive Page published under this account, each with a thumbnail, name, page ID, and conversion goal type (Mobile App / Custom URL). If there's nothing to pick, the bottom of the dropdown has a "Create a exclusive page for existing users" link that takes you back to the Exclusive Page creation flow (Part 1, Step 3).
Once filled in, click "Publish" (or "Save" for an already-live link) at the bottom-right of the ReflowLink editor. The rule takes effect immediately — the next returning user who matches it sees your Exclusive Page instead of the Fallback Page.
Configuration Done
After these 9 steps, the entire Exclusive Page flow is live. The next time a qualifying returning user reflows on this link, DeepClick automatically swaps the Fallback Page out for the Exclusive Page.
Back on the "Exclusive Page" list, the "Statistics" column for each page starts accumulating: Returning Visits, Returning Clicks, Existing CTR. From there, the operations work is reading those numbers and deciding whether to adjust the threshold, swap creatives, or add new Exclusive Pages.
If you have questions, you can reach a Customer Success Manager via the contact entry on DeepClick Platform.
Still exploring what an Exclusive Page can do? See Exclusive Page: Send Returning Users Straight to a Dedicated Landing Page.