Smart Cloak Setup Guide: Pass Reviews Smartly, Grow Without Worry

Smart Cloak is DeepClick Platform's traffic routing solution—a single Cloak Link, with reviewers going to the Review Link and real users going to the Real Link.
This guide walks you through building your first Cloak Link from scratch in the backend: pick a mode, fill in the links, configure rules, submit. Then verify routing with the Access Log.
⚡ TL;DR: 10 steps in DeepClick Platform—7 to build a Cloak Link from scratch + 2 to analyze logs + 1 to clone configurations.
New to Smart Cloak? See Smart Cloak: Ad Cloaking Services for Review-Proof, Stable Growth.
Part 1: Build Your First Cloak Link
Step 1: Open the Smart Cloak Module
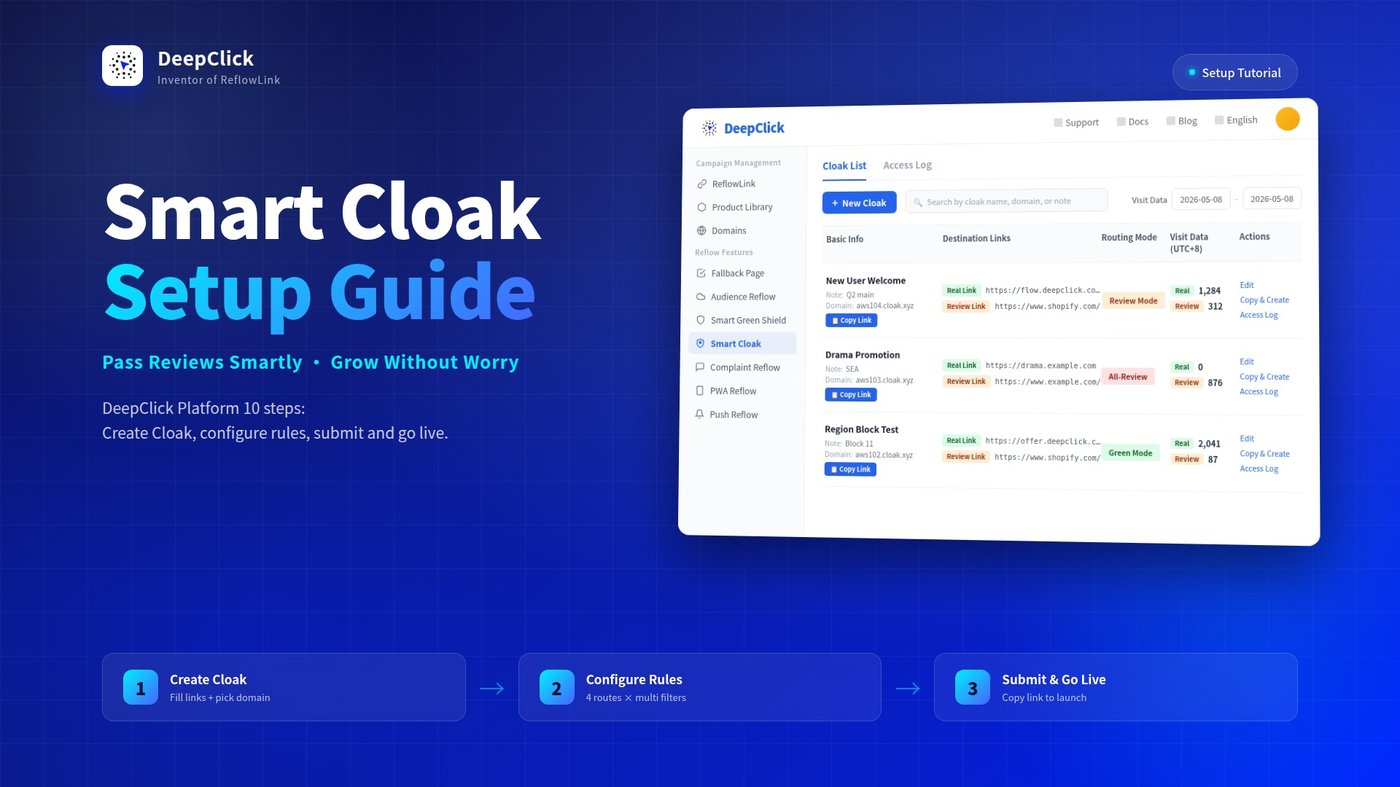
Log in to DeepClick Platform. In the left sidebar, find "Smart Cloak" under the "Reflow Features" group.

Step 2: Browse the Cloak List
The default tab is "Cloak List." The top action bar has 3 controls:
- Left: "+ New Cloak" button
- Middle: search box—"Search by cloak name, domain, or note"
- Right: "Visit Data" date range filter
The list table has 5 columns:
|
Column |
Content |
|---|---|
|
Basic Info |
Cloak name + note + domain + cloak ID + Copy Link button |
|
Destination Links |
Real Link (green chip) + Review Link (orange chip), each with URL |
|
Routing Mode |
Tag: Review Mode / All-Review / All-Open / Green Mode |
|
Visit Data (UTC+8) |
Real Link N + Review Link N, visit counts within the selected date range |
|
Actions |
Edit / Copy & Create / Access Log |

Step 3: Fill in Link Configuration
Click "+ New Cloak" in the top-right; the new cloak panel opens. The left navigation has three sections: Link Configuration / Rule Configuration / Basic Info—fill them in this order.
The Link Configuration section has three required fields:
Real Link: The destination URL real users actually see. This can be a regular ad landing page URL, or a Reflow Link URL—in the latter case, the path becomes "Cloak Link → Real Link (= Reflow Link) → Reflow Landing Page," chaining review-proofing and reflow conversion together.
Review Link: The compliant URL reviewers see. The input field has a category dropdown with 11 common presets: Default / Game Site / E-commerce / Business / Photography / Mini Game / Finance / Tools / CF BLOCK / Marketing Campaign / Custom.
Pick a category and the system auto-fills a corresponding standard review URL (e.g., picking "E-commerce" auto-fills https://www.shopify.com/)—no need to hunt for "a page that looks compliant for this category." If you want to use your own page, pick "Custom" and enter the URL.
Domain Selection: Pick an available cloak domain from the dropdown. Your generated Cloak Link will live under this domain.

Step 4: Choose a Routing Mode
Switch to the "Rule Configuration" section. You'll see 4 routing mode cards—pick one.

Reference table:
|
Routing Mode |
All Visitors Go To |
Use Case |
|---|---|---|
|
All-Review |
All to Review Link |
Cold-start campaigns, emergency takedowns |
|
Review Mode |
Rule-based routing |
Clear primary regions, route by country |
|
All-Open |
All to Real Link |
Stable operation, no routing needed |
|
Green Mode |
Rule-based (country logic flipped) |
Block specific countries outside primary regions |
Pick All-Review or All-Open: skip to Step 6 (Basic Info)—no rules to configure.
Pick Review Mode or Green Mode: continue with Step 5 to configure rules.
Step 5: Configure Filter Rules (Review Mode / Green Mode Only)
Once you pick "Review Mode" or "Green Mode," the full set of rule fields expands below. Configure them one by one:
Target Countries
Multi-select dropdown. The hint differs by routing mode:
- Review Mode: "Configured regions go to the Real Link; unconfigured regions go to the Review Link." Your primary campaign regions go to the Real Link.
- Green Mode: "Configured regions go to the Review Link; unconfigured regions go to the Real Link." Regions outside your primary campaign go to the Review Link.
Green Mode comes pre-filled with 11 high-review-risk countries (China, Hong Kong SAR, Singapore, the United States, Ireland, etc.)—use as is or adjust as needed.
Environment Filter Rules
The group's hint: "Checked entries go to the Review Link; unchecked entries go to the Real Link." Two sub-dimensions:
Browser Language: Multi-select dropdown. Check the languages reviewers might use to route them to the Review Link.
Device: Desktop / Mobile / Tablet, three checkboxes. Check the device types outside your campaign's scope to route them to the Review Link.
IP Blacklist
Specific IPs or IP ranges, one per line. Add known reviewer office network ranges or crawler IP ranges to send these visits to the Review Link.
ISP Blacklist
Dropdown to pick ISPs. Data center ISPs primarily carry crawler and scanning traffic—blacklist them as a group to send to the Review Link.
Block Proxy
Toggle. When enabled, all visits identified as proxied are routed to the Review Link.
Block Empty Language
Toggle. When enabled, HTTP requests without an Accept-Language header (i.e., "empty language") are routed to the Review Link—real browsers always send language info.


Step 6: Fill in Basic Info
Switch to the "Basic Info" section. Two fields:
- Name (required, 30 characters max): The cloak's name. Used for identification in the list and access logs
- Note (optional, 30 characters max): Internal notes for yourself or teammates

Step 7: Submit to Activate
Once filled in, click the blue "Submit" button at the bottom-right of the panel ("Cancel" is at bottom-left).
After submission, the cloak is live immediately. Back on the list page, you'll see your newly created cloak; the Basic Info column has a Copy Link button—click it to copy the Cloak Link to your clipboard, ready for ad placement.

Part 2: Analyze the Access Log
After your cloak is live, use the Access Log to verify routing accuracy and troubleshoot anomalies.
Step 8: Open the Access Log
Two entry points:
- Global view: switch the top tab to "Access Log" on the cloak list page
- Single cloak: click "Access Log" in the actions column for a specific cloak

Step 9: Filter and Interpret
The Access Log page has 4 filter dimensions at the top:
- Network Status
- Destination (Review Link / Real Link)
- Cloak Selection
- Date Range
Table columns (5):
|
Column |
Content |
|---|---|
|
Basic Info |
Which cloak this visit belongs to |
|
Visit Info |
Visit timestamp, IP, region, etc. |
|
Network Status |
Network type / proxy detection |
|
Destination |
Whether this visit was routed to Real Link or Review Link |
|
Device Info |
Device type, browser, language, etc. |
Filter by "Destination" to quickly inspect routing ratios; filter by "Network Status" to investigate proxy traffic; filter by "Cloak Selection" to focus on a specific cloak.
Part 3: Advanced—Copy & Create
If you already have one cloak configured and want to spin up another similar one (e.g., different domain, different real link), no need to start over—use "Copy & Create."
Step 10: Clone Configuration in One Click
Each row's actions column has a "Copy & Create" button. Click it, and the new cloak panel opens with all configuration (links, domain, routing mode, rules, basic info) copied from the source cloak. Just modify the differentiating fields (e.g., name, domain, specific rules) and submit.
Good for:
- Building separate cloak links for different campaigns under the same rule set, so you can analyze data per cloak in the Access Log
- Cloning a few backup cloaks once your primary one is verified
- Testing different Review Link category presets
Configuration Done
After these 7 steps, your Cloak Link is live and routing automatically by rule—no further action required. The Access Log and Copy & Create are your two daily-use tools: the former for verification and troubleshooting, the latter for scaling and backups.
If you have questions, you can reach a Customer Success Manager via the contact entry on DeepClick Platform.
Still exploring what Smart Cloak can do? See Smart Cloak: Ad Cloaking Services for Review-Proof, Stable Growth.